长列表无限下拉的实现(上)
分页还是无限下拉?
在正式开始之前,先简单了解一下分页与无限下拉分别适用的场景。
分页
分页技术是指将内容信息划分成独立的页面来显示。如果你滚到一个页面的底部看到一行数字,这些数字就是当前站点或者应用程序里面的分页。
当用户是在结果列表查找特定的信息而不是仅仅浏览信息流时,分页就是好的选择——用户可以知道结果的准确数量,能够决定在哪里停下或者精读哪些结果,政务类网站以分页显示居多。
无限下拉
无限下拉加载技术使用户在大量成块的内容面前一直滚动查看。这种方法是在你向下滚动的时候不断加载新内容。虽然听起来比较诱人,但该技术并不是一个面向任何网站或应用程序的通用方案。
当你使用滚动作为发现数据的主要方法时,它可能使你的用户在网页上停留更长时间并提升用户参与度。在门户网站与社交媒体中,无限下拉被大量使用。
相比点击,滚动操作起来也更加容易,对移动设备很友好。
无限下拉的两种实现方式
懒加载
当页面滚动到底部时,进行下一页内容的查询并将结果添加到结果列表中,这就是懒加载。在这种场景下,列表中的 dom元素数量是累加的。
虚拟滚动
虚拟滚动(也叫虚拟列表),尽管在表现形式上与懒加载相似,但列表中展示的 dom元素数量实际是固定的。
无限下拉之懒加载的实现
Vue 中原生实现
前面说了懒加载的触发条件是页面滚动到底部。判断滚动条到底部,需要用到 DOM 的三个属性值,即 scrollTop、clientHeight、scrollHeight。
简单来说,scrollTop为滚动条在 Y 轴上的滚动距离;clientHeight为内容可视区域的高度;scrollHeight为内容可视区域的高度加上溢出(滚动)的距离。具体如下图所示: 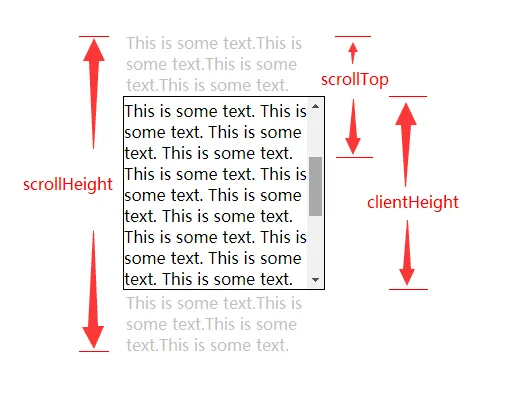
所以可推得页面滚动到底部的条件为 Math.floor(scrollHeight - scrollTop) === clientHeight。
之所以用到向下取整是因为 scrollHeight可能是小数。在 chrome中会存在这样一种情况——假设 scrollHeight为 501,clientHeight为 500,拖到底部 scrollTop只有零点几。  完整代码如下:
<template>
  <div class="container" ref="container">
    <div class="content" v-for="(item, index) in shownlist" :key="index">
      <div style="width: 100%;height: 1rem;">{{ item.id }}</div>
    </div>
    <div class="loading" v-show="isBusy">loading.....</div>
  </div>
</template>

<script>
import { findByPagination } from "@/mock/index";

export default {
  name: "MyOwnInfiScrollerView",
  data() {
    return {
      shownlist: [],
      isBusy: false,
      page: {
        pagination: 0,
        pageSize: 5,
      },
    };
  },
  created() {
    this.appedToShownList(this.page.pagination, this.page.pageSize);
  },
  mounted() {
    const obj = this.$refs.container;
    const that = this;

    // eslint-disable-next-line func-names
    obj.addEventListener("scroll", function () {
      // 向下取整,解决chrome中scrollTop可以为小数的问题
      if (
        Math.floor(this.scrollHeight - this.scrollTop) === this.clientHeight &&
        that.isBusy === false
      ) {
        // isBusy 实现节流
        console.log("到底部了");
        that.isBusy = true;

        setTimeout(() => {
          that.appedToShownList(that.page.pagination, that.page.pageSize);
          that.isBusy = false;
        }, 1000);
      }
    });
  },
  methods: {
    loadMore() {
      this.isBusy = true;
      console.log(`loading... ${new Date()}`);

      setTimeout(() => {
        console.log(`end... ${new Date()}`);
        this.appedToShownList(this.page.pagination, this.page.pageSize);
        this.isBusy = false;
      }, 500);
    },
    appedToShownList(pagination = 0, pageSize = 5) {
      const newData = findByPagination(pagination, pageSize).data.list;
      this.shownlist = [...this.shownlist, ...newData];
      this.page.pagination += 1;
    },
  },
};
</script>

<style lang="less" scoped>
.container {
  height: 500px;
  border: 1px solid gray;
  width: 600px;
  margin: 0 auto;
  overflow: auto;
}
.content {
  border: 1px solid orange;
  width: 80%;
  margin: 0 auto 8.1px auto;
  height: 18%;
}
.loading {
  font-weight: bold;
  font-size: 20px;
  color: grey;
  text-align: center;
}
</style>Vue 中通过插件实现
追求效率可以直接使用饿了么团队出品的无限滚动/vue-infinite-scroll,通过自定义指令的方式使用,核心代码如下:
<template>
  <div
    class="container"
    v-infinite-scroll="loadMore"
    infinite-scroll-disabled="isBusy"
    infinite-scroll-distance="10"
  >
    <div class="content" v-for="(item, index) in shownlist" :key="index">
      <div style="width: 100%;height: 1rem;">{{ item.id }}</div>
    </div>
    <div class="loading" v-show="isBusy">loading.....</div>
  </div>
</template>

<script>
export default {
  name: 'VueInfiScrollView',
  data() {
    return {
      shownlist: [],
      isBusy: false,
    };
  },
  methods: {
    loadMore() {
      ...
    },
  },
};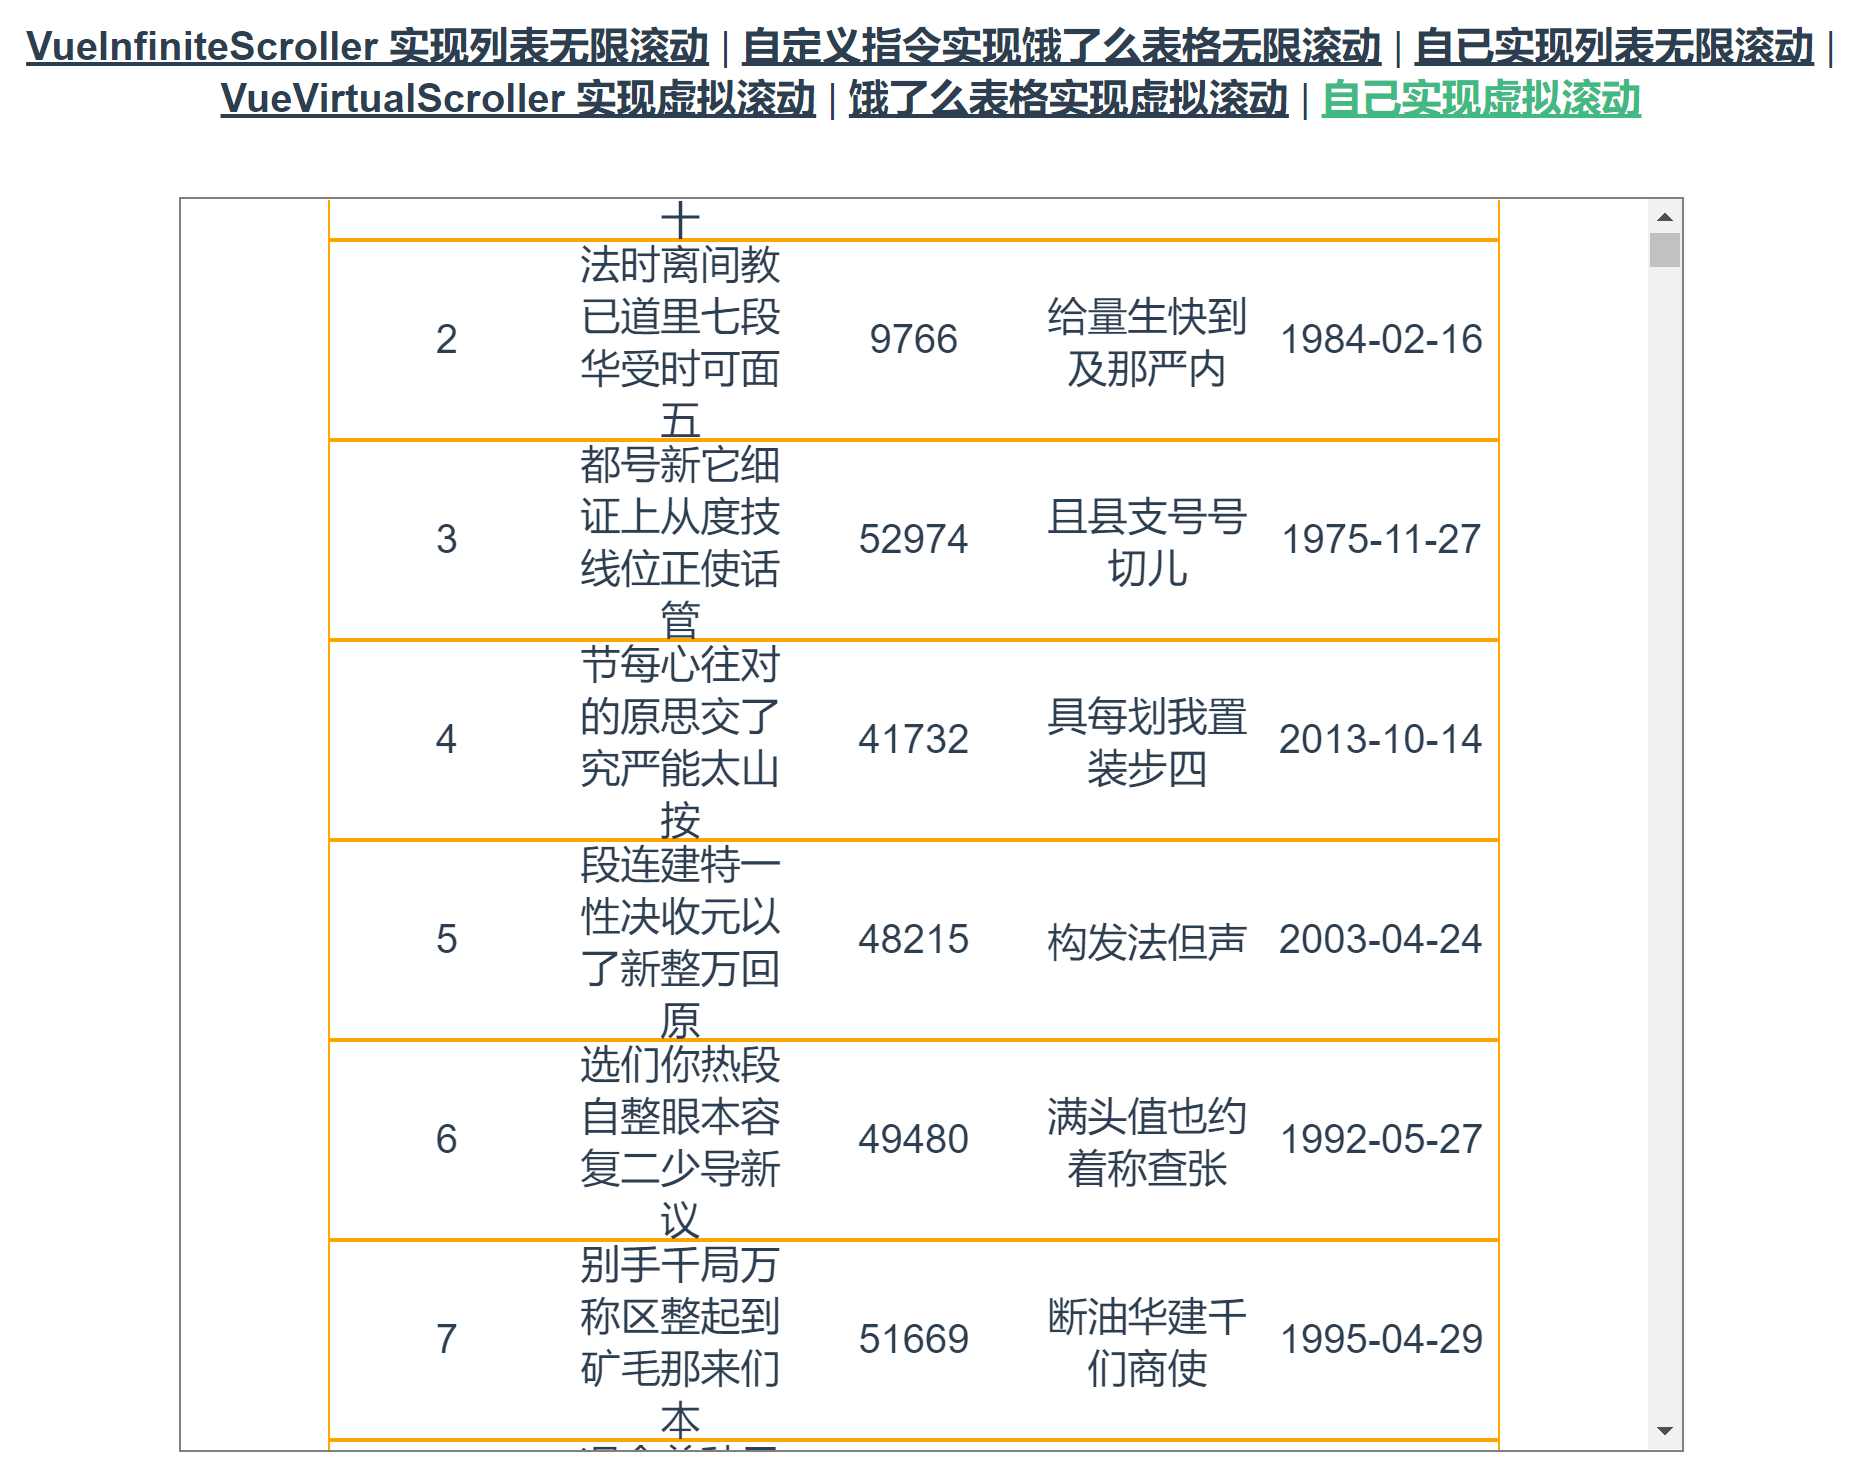
</script>在 element-ui Table 组件中的实现
上面的案例都是在自己创建的列表,还有比较常见的是需要组件库中的表格组件实现懒加载,这里以 element-ui的 table为例,效果如下图所示:
大体的思路与上面的实现一致,不过需要需要获取正确的容器——选择器为 .el-table__body-wrapper的 div。考虑到复用性,使用了自定义指令,核心代码如下:
const eltableLoad = {
  bind: (el, binding) => {
    const selectWrap = el.querySelector(".el-table__body-wrapper");

    selectWrap.addEventListener("scroll", function () {
      if (Math.floor(this.scrollHeight - this.scrollTop) <= this.clientHeight) {
        binding.value();
      }
    });
  },
};<template>
<div>
<el-table
:data="tableData"
style="width: 80%; margin: 0 auto"
max-height="250"
v-eltable-load="loadMore"
>
...
</el-table>
</div>
</template>
<script>
...
export default {
name: 'TableLazyLoadView',
data() {
return {
tableData: [],
};
},
methods: {
loadMore() {
...
},
...
},
};
</script>这里的实现比较简单,当 table到底部时会调用 v-eltable-load绑定的方法。我其实是想将节流的操作也以自定义指令的形式来实现,像 vue-infinite-scroll一样。但我不知道一个指令是如何获得另一个指令的入参的,希望有大佬可以指点一下。
无限下拉之虚拟滚动的实现
虚拟滚动原理
虚拟滚动原理如下图所示:
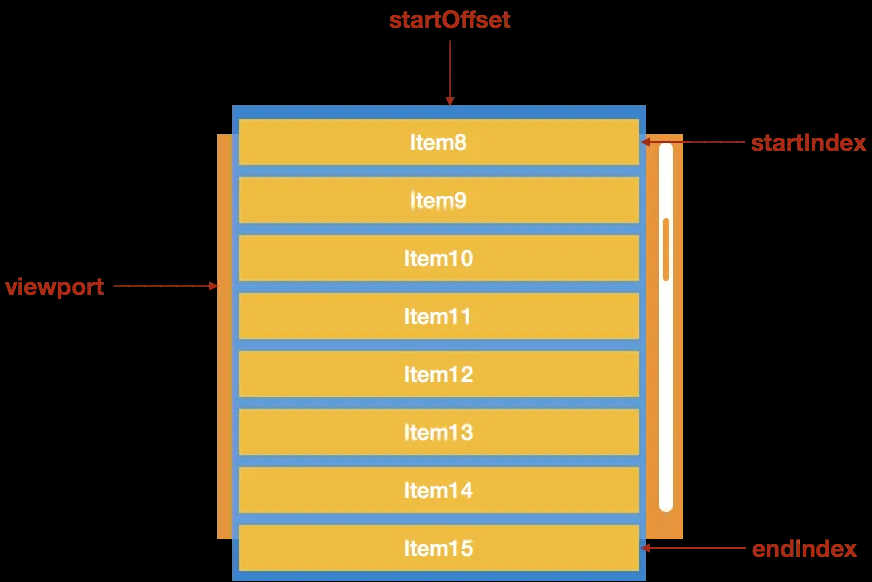
可以看到视口高度是固定的,子元素的高度也是固定的,我们可以推算出一个视口最多可以看到多少个元素。只需改变列表中元素的上下空白占位即可实现虚拟滚动的效果。实现的整体思路如下:
- 计算容器最大容积数量
- 监听滚动事件动态截取数据
- 动态设置上下空白占位(核心)
- 下拉到底部时请求数据
- 滚动事件节流定时器优化
- 设置缓冲区优化快速滚动时的白屏问题
计算容器最大容积数量
在列表内容等高的情况下,容器最大容积数量 = Math.floor(容器的高度 / 列表每项内容的高度) + 2。之所以要 +2 是因为视口中第一项和最后一项可能并不完整,如下图所示:
需要注意的是,假如列表的高度并非固定,而是会随着当视口变化。那么当视口改变时(大小改变或翻转),容器最大容积数量也应发生变化,具体代码如下:
<template>
  <div class="container" ref="container">
    <div class="content" v-for="(item, index) in shownlist" :key="index">
      ...
    </div>
  </div>
</template>

<script>
export default {
  name: "MyOwnVirtualScrollerView",
  data() {
    return {
      shownlist: [],
      itemHeight: 80, // 列表每项内容的高度
      maxVolume: 0, //  容器的最大容积
    };
  },
  mounted() {
    this.getMaxVolume();
    // 如果列表的高度并非固定,而是会随着当视口变化,需要增加监听事件
    // window.onresize = () => this.getMaxVolume();
    // window.orientationchange = () => this.getMaxVolume();
  },
  methods: {
    // 计算容器的最大容积
    getMaxVolume() {
      this.maxVolume =
        Math.floor(this.$refs.container.clientHeight / this.itemHeight) + 2;
    },
  },
};
</script>监听滚动事件动态截取数据
监听用户滚动事件,根据滚动位置,动态计算当前可视区域起始数据的索引位置 beginIndex,再根据最大容积数量 maxVolume,计算结束数据的索引位置 endIndex,最后根据 beginIndex与 endIndex截取长列表需宣显示的数据,代码修改后如下:
<template>
  <!-- .passive 会告诉浏览器你不想阻止事件的默认行为,以提高性能 -->
  <div class="container" ref="container" @scroll.passive="handleScroll">
    <div class="content" v-for="(item, index) in shownList" :key="index">
      ...
    </div>
  </div>
</template>

<script>
export default {
  data() {
    return {
      dataSource: [], // 数据源
      itemHeight: 80, // 列表每项内容的高度
      maxVolume: 0, //  容器的最大容积
      beginIndex: 0, // 当前滚动的第一个元素索引
    };
  },
  computed: {
    // 当前滚动的最后一个元素索引
    endIndex() {
      let endIndex = this.beginIndex + this.maxVolume;
      if (!this.dataSource[endIndex]) {
        endIndex = this.dataSource.length - 1;
      }
      return endIndex;
    },
    // 列表中要展示的元素集合
    shownList() {
      return this.dataSource.slice(this.beginIndex, this.endIndex + 1);
    },
  },
  mounted() {
    this.getMaxVolume();
    // 如果列表的高度并非固定,而是会随着当视口变化,需要增加监听事件
    // window.onresize = () => this.getMaxVolume();
    // window.orientationchange = () => this.getMaxVolume();
  },
  methods: {
    // 计算容器的最大容积
    getMaxVolume() {
      this.maxVolume =
        Math.floor(this.$refs.container.clientHeight / this.itemHeight) + 2;
    },
    // 滚动行为事件,记录滚动的第一个元素索引
    handleScroll() {
      this.beginIndex = Math.floor(
        this.$refs.container.scrollTop / this.itemHeight
      );
    },
  },
};
</script>动态设置上下空白占位
根据 beginIndex和 endIndex,可以动态计算出上下空白高度。而上下空白占位的实现可以有两种思路:一种是通过 padding填充,如tangbc/vue-virtual-scroll-list;另一种可以 transform偏移来实现,如 Akryum/vue-virtual-scroller。这里我采用第一种方案,具体代码如下:
<template>
  <!-- .passive 会告诉浏览器你不想阻止事件的默认行为,以提高性能 -->
  <div class="container" ref="container" @scroll.passive="handleScroll">
    <!-- 注意:增加 padding 需要给列表再包一层,不能直接加在容器上,避免改变容器的 clientHeight -->
    <div :style="blankFilledStyle" class="group">
      <div class="item" v-for="(item, index) in shownList" :key="index">
        ...
      </div>
    </div>
  </div>
</template>

<script>
export default {
  data() {
    return {
      dataSource: [], // 数据源
      itemHeight: 80, // 列表每项内容的高度
      maxVolume: 0, //  容器的最大容积
      beginIndex: 0, // 当前滚动的第一个元素索引
    };
  },
  computed: {
    // 当前滚动的最后一个元素索引
    endIndex() {
      let endIndex = this.beginIndex + this.maxVolume;
      if (!this.dataSource[endIndex]) {
        endIndex = this.dataSource.length - 1;
      }
      return endIndex;
    },
    // 列表中要展示的元素集合
    shownList() {
      return this.dataSource.slice(this.beginIndex, this.endIndex + 1);
    },
    // 计算上下空白占位高度样式
    blankFilledStyle() {
      return {
        paddingTop: `${this.beginIndex * this.itemHeight}px`,
        paddingBottom: `${
          (this.dataSource.length - this.endIndex - 1) * this.itemHeight
        }px`,
      };
    },
  },
  mounted() {
    this.getMaxVolume();
    // 如果列表的高度并非固定,而是会随着当视口变化,需要增加监听事件
    // window.onresize = () => this.getMaxVolume();
    // window.orientationchange = () => this.getMaxVolume();
  },
  methods: {
    // 计算容器的最大容积
    getMaxVolume() {
      this.maxVolume =
        Math.floor(this.$refs.container.clientHeight / this.itemHeight) + 2;
    },
    // 滚动行为事件,记录滚动的第一个元素索引
    handleScroll() {
      this.beginIndex = Math.floor(
        this.$refs.container.scrollTop / this.itemHeight
      );
    },
  },
};
</script>此时表中有1000条数据,但是表中的dom元素数量始终是8效果如下图所示: 
下拉到底部时请求数据
上面模拟的使用都是findAll的接口,然而实际场景中,数据量特别大有几万条的话,不做分页肯定是不合适的,修改代码如下:
<template>
  <!-- .passive 会告诉浏览器你不想阻止事件的默认行为,以提高性能 -->
  <div class="container" ref="container" @scroll.passive="handleScroll">
    <!-- 注意:增加 padding 需要给列表再包一层,不能直接加在容器上,避免改变容器的 clientHeight -->
    <div :style="blankFilledStyle" class="group">
      <div class="item" v-for="(item, index) in shownList" :key="index">
        ...
      </div>
      <div class="loading" v-show="isBusy">loading.....</div>
    </div>
  </div>
</template>

<script>
import { findByPagination } from "@/mock/index";

export default {
  data() {
    return {
      dataSource: [], // 数据源
      itemHeight: 80, // 列表每项内容的高度
      maxVolume: 0, //  容器的最大容积
      beginIndex: 0, // 当前滚动的第一个元素索引
      page: {
        pagination: 0,
        pageSize: 20,
      },
      isBusy: false, // 是否在请求数据
    };
  },
  computed: {
    // 当前滚动的最后一个元素索引
    endIndex() {
      let endIndex = this.beginIndex + this.maxVolume;
      if (!this.dataSource[endIndex]) {
        endIndex = this.dataSource.length - 1;
      }
      return endIndex;
    },
    // 列表中要展示的元素集合
    shownList() {
      return this.dataSource.slice(this.beginIndex, this.endIndex + 1);
    },
    // 计算上下空白占位高度样式
    blankFilledStyle() {
      return {
        paddingTop: `${this.beginIndex * this.itemHeight}px`,
        paddingBottom: `${
          (this.dataSource.length - this.endIndex - 1) * this.itemHeight
        }px`,
      };
    },
  },
  created() {
    // this.dataSource = generageList(20).data;
    this.addItemsToDataSource();
  },
  mounted() {
    this.getMaxVolume();
    // 如果列表的高度并非固定,而是会随着当视口变化,需要增加监听事件
    // window.onresize = () => this.getMaxVolume();
    // window.orientationchange = () => this.getMaxVolume();
  },
  methods: {
    // 计算容器的最大容积
    getMaxVolume() {
      this.maxVolume =
        Math.floor(this.$refs.container.clientHeight / this.itemHeight) + 2;
    },
    // 滚动行为事件,记录滚动的第一个元素索引
    handleScroll() {
      this.beginIndex = Math.floor(
        this.$refs.container.scrollTop / this.itemHeight
      );
      if (
        this.beginIndex + this.maxVolume > this.dataSource.length - 1 &&
        !this.isBusy
      ) {
        console.log("滚动到底部了");
        // 追加请求新的数据
        this.isBusy = true;
        // setTimeout 模拟异步,本来想直接在 mockjs 直接返回 promise 的,但是好像不行
        setTimeout(() => {
          this.addItemsToDataSource();
          this.isBusy = false;
        }, 500);
      }
    },
    addItemsToDataSource() {
      const {
        data: { list },
      } = findByPagination(this.page.pagination, this.page.pageSize);
      this.dataSource = [...this.dataSource, ...list];
      this.page.pagination += 1;
    },
  },
};
</script>滚动事件节流定时器优化
通过打印可以看到滚动事件触发频率非常高,如下图所示:
修改代码如下:
  methods: {
// 滚动行为事件,记录滚动的第一个元素索引
    handleScroll() {
      if (!this.isScrolling) {
        this.isScrolling = true;
        // 时间间隔 30 ms,比较合适,太大会有很明显的白屏
        const scrollerTimer = setTimeout(() => {
          this.isScrolling = false;
          clearTimeout(scrollerTimer);
        }, 30);
        console.log('触发滚动事件');

        this.setDataBeginIndex();
      }
    },
    // 执行数据设置的相关任务,滚动时间的具体行为
    setDataBeginIndex() {
      this.beginIndex = Math.floor(this.$refs.container.scrollTop / this.itemHeight);
      if (this.beginIndex + this.maxVolume > this.dataSource.length - 1 && !this.isBusy) {
        console.log('滚动到底部了');
        // 追加请求新的数据
        this.isBusy = true;
        // setTimeout 模拟异步,本来想直接在 mockjs 直接返回 promise 的,但是好像不行
        setTimeout(() => {
          this.addItemsToDataSource();
          this.isBusy = false;
        }, 500);
      }
    },
}设置缓冲区优化快速滚动时的白屏问题
当设备的渲染性能差的时候,当快速滚动时用户可能会看到白屏,普遍的优化方案是增加缓冲区。也就是在计算展示列表时,多渲染一屏或多屏的数据,修改代码如下:
    // 列表中要展示的元素集合
    shownList() {
      let beginIndex = 0;
      beginIndex = this.beginIndex <= this.maxVolume ? 0 : this.beginIndex - this.maxVolume;
      // return this.dataSource.slice(this.beginIndex, this.endIndex + 1);
      return this.dataSource.slice(beginIndex, this.endIndex + 1);
    },
    // 计算上下空白占位高度样式
    blankFilledStyle() {
      let beginIndex = 0;
      beginIndex = this.beginIndex <= this.maxVolume ? 0 : this.beginIndex - this.maxVolume;

      return {
        paddingTop: `${beginIndex * this.itemHeight}px`,
        paddingBottom: `${(this.dataSource.length - this.endIndex - 1) * this.itemHeight}px`,
      };
},但是白屏问题从根本上是无法解决的,因为这与设备的渲染性能有关。我看到有一些开发者会限制用户的最大滚动速度以避免这个问题。
路由切换定位列表滚动位置
假设有一个新闻列表,可以点击内容跳转查看详情。如果每次跳转后返回,列表都会回到第一行,那么用户体验就很不好。
为了解决这个问题,需要用到vue的keep-alive,核心代码如下:
// App.vue
<keep-alive>
  <router-view/>
</keep-alive>data() { return { scrollTop: 0, // 记录滚动后距离顶部的距离 }; }, // 被
keep-alive 缓存的组件激活时调用 activated() { this.$nextTick(() => {
this.$refs.container.scrollTop = this.scrollTop; }); }, methods:{ //
执行数据设置的相关任务,滚动事件的具体行为 setDataBeginIndex() { this.scrollTop
= this.$refs.container.scrollTop; this.beginIndex =
Math.floor(this.$refs.container.scrollTop / this.itemHeight); ... }, }Element-ui table 实现虚拟滚动
详情阅读 csdn 的这篇文章《element 表格组件实现虚拟滚动,解决卡顿问题》,代码如下:
<template>
  <el-table
    :data="tableData"
    ref="tableRef"
    style="width: 900px;margin: 0 auto;"
    max-height="380"
    border
    stripe
    class="myTable"
  >
    <el-table-column
      prop="date"
      label="必要元素:"
      min-width="150"
      align="center"
      fixed="left"
    >
    </el-table-column>
    <el-table-column label="每一行高度必须相同">
      <el-table-column
        prop="name"
        label="class不能为【myTable】"
        min-width="180"
        align="center"
      >
      </el-table-column>
      <el-table-column label="ref不能为【tableRef】">
        <el-table-column
          prop="province"
          label="省份"
          min-width="150"
          align="center"
        >
        </el-table-column>
        <el-table-column
          prop="city"
          label="市区"
          min-width="150"
          align="center"
        >
        </el-table-column>
        <el-table-column
          prop="address"
          label="地址"
          min-width="150"
          align="center"
        >
        </el-table-column>
      </el-table-column>
    </el-table-column>
    <el-table-column label="操作" fixed="right" min-width="160" align="center">
      <template>
        <el-button size="mini">编辑</el-button>
        <el-button size="mini" type="danger">删除</el-button>
      </template>
    </el-table-column>
  </el-table>
</template>

<script>
export default {
  data() {
    return {
      tableData: [],
      saveDATA: [],
      tableRef: null,
      tableWarp: null,
      fixLeft: null,
      fixRight: null,
      tableFixedLeft: null,
      tableFixedRight: null,
      scrollTop: 0,
      num: 0,
      start: 0,
      end: 42, // 3倍的pageList
      starts: 0, // 备份[保持与上一样]
      ends: 42, // 备份[保持与上一样]
      pageList: 14, // 一屏显示
      itemHeight: 41, // 每一行高度
      timeOut: 400, // 延迟
    };
  },
  created() {
    this.init();
  },
  mounted() {
    this.$nextTick(() => {
      this.tableRef = this.$refs.tableRef.bodyWrapper;
      this.tableFixedLeft = document.querySelector(
        ".el-table .el-table__fixed .el-table__fixed-body-wrapper"
      );
      this.tableFixedRight = document.querySelector(
        ".el-table .el-table__fixed-right .el-table__fixed-body-wrapper"
      );
      /**
       * fixed-left | 主体 | fixed-right
       */
      // 主体改造
      const divWarpPar = document.createElement("div");
      divWarpPar.style.height = `${this.saveDATA.length * this.itemHeight}px`;
      const divWarpChild = document.createElement("div");
      divWarpChild.className = "fix-warp";
      divWarpChild.append(this.tableRef.children[0]);
      divWarpPar.append(divWarpChild);
      this.tableRef.append(divWarpPar);

      // left改造
      const divLeftPar = document.createElement("div");
      divLeftPar.style.height = `${this.saveDATA.length * this.itemHeight}px`;
      const divLeftChild = document.createElement("div");
      divLeftChild.className = "fix-left";
      // eslint-disable-next-line no-unused-expressions
      this.tableFixedLeft &&
        divLeftChild.append(this.tableFixedLeft.children[0]);
      divLeftPar.append(divLeftChild);
      // eslint-disable-next-line no-unused-expressions
      this.tableFixedLeft && this.tableFixedLeft.append(divLeftPar);

      // right改造
      const divRightPar = document.createElement("div");
      divRightPar.style.height = `${this.saveDATA.length * this.itemHeight}px`;
      const divRightChild = document.createElement("div");
      divRightChild.className = "fix-right";
      // eslint-disable-next-line no-unused-expressions
      this.tableFixedRight &&
        divRightChild.append(this.tableFixedRight.children[0]);
      divRightPar.append(divRightChild);
      // eslint-disable-next-line no-unused-expressions
      this.tableFixedRight && this.tableFixedRight.append(divRightPar);

      // 被设置的transform元素
      this.tableWarp = document.querySelector(
        ".el-table .el-table__body-wrapper .fix-warp"
      );
      this.fixLeft = document.querySelector(
        ".el-table .el-table__fixed .el-table__fixed-body-wrapper .fix-left"
      );
      this.fixRight = document.querySelector(
        ".el-table .el-table__fixed-right .el-table__fixed-body-wrapper .fix-right"
      );

      this.tableRef.addEventListener("scroll", this.onScroll);
    });
  },
  methods: {
    init() {
      this.saveDATA = [];
      for (let i = 0; i < 10000; i += 1) {
        this.saveDATA.push({
          date: i,
          name: `王小虎${i}`,
          address: "1518",
          province: "github:",
          city: "divcssjs",
          zip: `divcssjs${i}`,
        });
      }
      this.tableData = this.saveDATA.slice(this.start, this.end);
    },
    onScroll() {
      this.scrollTop = this.tableRef.scrollTop;
      this.num = Math.floor(this.scrollTop / (this.itemHeight * this.pageList));
    },
  },
  watch: {
    num(newV) {
      if (newV > 1) {
        this.start = (newV - 1) * this.pageList;
        this.end = (newV + 2) * this.pageList;
        setTimeout(() => {
          this.tableWarp.style.transform = `translateY(${
            this.start * this.itemHeight
          }px)`;
          if (this.fixLeft) {
            this.fixLeft.style.transform = `translateY(${
              this.start * this.itemHeight
            }px)`;
          }
          if (this.fixRight) {
            this.fixRight.style.transform = `translateY(${
              this.start * this.itemHeight
            }px)`;
          }
          this.tableData = this.saveDATA.slice(this.start, this.end);
        }, this.timeOut);
      } else {
        setTimeout(() => {
          this.tableData = this.saveDATA.slice(this.starts, this.ends);
          this.tableWarp.style.transform = "translateY(0px)";
          if (this.fixLeft) {
            this.fixLeft.style.transform = "translateY(0px)";
          }
          if (this.fixRight) {
            this.fixRight.style.transform = "translateY(0px)";
          }
        }, this.timeOut);
      }
    },
  },
};
</script>
<style lang="less" scoped>
.myTable {
  /deep/ td {
    padding: 6px 0 !important;
  }
}

/*滚动条样式*/

/deep/ .el-table__body-wrapper::-webkit-scrollbar {
  /*滚动条整体样式*/
  width: 6px;
  /*高宽分别对应横竖滚动条的尺寸*/
  height: 8px;
}

/deep/ .el-table__body-wrapper::-webkit-scrollbar-thumb {
  /*滚动条里面小方块*/
  border-radius: 2px;
  background: #666;
}

/deep/ .el-table__body-wrapper::-webkit-scrollbar-track {
  /*滚动条里面轨道*/
  background: #ccc;
}
</style>核心原理一般无二,需要修改table的内部结构与通过transform来改变上下空白占位。不过这段代码有个一个小问题,代码中应该使用Element.querySelector而不是document.querySelector,避免页面中有多个table时影响功能。可以的话,我更倾向于直接使用vxe-table这样本身自带虚拟滚动的组件。
总结
在绝大多数场景,懒加载可以很好地解决客户端与服务端压力,缺点是滚动条是“虚假的”,无法滚动到底部。虚拟滚动的白屏问题无法从根本上解决,但是真正大量数据渲染场景下,虚拟滚动也许是唯一的解决方案。
Demo 地址
ivestszheng/virtual-scroll-demo。